
This has replaced pies at my house on Thanksgiving. Jereld is not a huge pumpkin pie fan. I made this one year, and Jereld decided that it is a tradition at our house! This is the 3rd year I'm making it for Thanksgiving (although last year I made it after Thanksgiving since we didn't cook the meal at our house).
I will have to take a picture of a slice on Thanksgiving! It's still in the spring form pan until then!
Pecan Pie Cheesecake
Thanks Bake or Break! Five Stars from everyone at my Thanksgiving table!
Crust:
1 3/4 C. vanilla wafer crumbs
1/4 C. firmly packed brown sugar
1/3 C. butter, melted
Preheat oven to 350 degrees F. Combine wafer crumbs and brown sugar. Stir in melted butter. Press into bottom and up sides of a 9" springform pan. Bake for 6 minutes. Set aside to cool.
Pecan Filling:
1 C. sugar
2/3 C. dark corn syrup
1/3 C. butter, melted
2 eggs
1 1/2 C. chopped pecans
1 tsp. vanilla extract
Combine all ingredients in a medium saucepan. Bring to a boil over medium-high heat. Reduce heat and simmer until thickened, about 8-10 minutes, stirring constantly. Pour into crust and set aside.
Cheesecake Filling:
3 (8 oz.) packages cream cheese, softened
1 1/4 C. firmly packed brown sugar
2 Tbsp. all-purpose flour
4 eggs
2/3 C. heavy whipping cream
1 tsp. vanilla extract
Reduce oven to 325 degrees F. With a hand mixer or stand mixer, beat cream cheese at medium speed until creamy. Add brown sugar and flour and beat until fluffy. Add eggs one at a time, beating well after each one. Stir in cream and vanilla. Pour over pecan filling. Bake for 1 hour.*** Turn off oven and leave cheesecake in oven with the door closed for 1 hour. Remove from oven and run a knife along the outside edges to loosen cheesecake from sides of pan. Let cool. Chill for at least 4 hours (I usually chill overnight) before serving.
***I always place the springform pan on a cookie sheet and then fill the cookie sheet with 1/4 " of water when I put the cheesecake in the oven to bake.
Tuesday, November 26, 2013
Sunday, September 22, 2013
Krispy Kreme Burgers

Just a meal idea that we tried and liked!
Some people use 2 doughnuts, but we just sliced them in half to create a bun. Top them with anything you would normally eat on a burger, but DON'T FORGET THE FRIED EGG!
Please don't bill me when you have to visit the emergency room with a heart attach though!
Monday, September 2, 2013
Here's a good granola recipe that makes a lot! We had it at a reunion this summer with Vanilla yogurt and frozen berries on it. (and I'm not a yogurt fan).
BAKED GRANOLA
1 lg. canister old fashioned oats
1 bag coconut
1 bag slivered almonds (and of course I had pecans also)
1 c. brown sugar
1 c. maple syrup
3/4 c. oil
Mix well. Spread on 2 cookie sheets and bake for about 2 hours at 250 degrees until browned. Stir every 30 minutes or so. (I did about 1 hour and 45 minutes.
I had a picture but can't get it to post. I did both cookie sheets at the same time - just rotated them from top to bottom.
Thursday, June 20, 2013
Cornbread Even My Husband Likes
I combined a few things that I like about cornbread to come up with this recipe! Jereld doesn't usually like cornbread, but he said he will have to take a few pieces of this with him to work...SUCCESS! If you like sweet cornbread, this recipe is for you!


Cornbread Jereld (cheesy that I named it after him???)
3 2/3 C. flour
1/3 C. nonfat dry milk
1 C. yellow corn meal
2 C. white sugar
3 Tbsp. baking powder
1 tsp. salt
13 Tbsp. butter, melted (I used the salted variety)
4 eggs
1 2/3 C. milk
1 tsp. vanilla extract
Mix flour, nonfat dry milk, cornmeal, sugar, baking powder, and salt in a large mixing bowl. Add melted butter and combine until it is an even texture throughout. Add eggs, milk, and vanilla, and mix with a hand mixer until mostly smooth (you will still have some clumps, but that is OK!).
Spray an 11x13 pan with cooking spray (or you can use a 9x13 and a 4x8 bread pan for the leftovers like I did--your choice). Pour batter into prepared pans. Bake at 350 degrees F for 25-35 minutes or until an inserted toothpick comes out clean.
Thursday, May 2, 2013
Garlic-Lemon Double Stuffed Chicken
This recipe is adapted from Allrecipes.com
This recipe is definitely NOT LOW FAT!! Yikes! But...of course...delicious. I didn't take a picture of my last 2 creations, so you'll have to enjoy the pictures provided by the original websites if you're curious.
Make this! You won't regret it!
This recipe is definitely NOT LOW FAT!! Yikes! But...of course...delicious. I didn't take a picture of my last 2 creations, so you'll have to enjoy the pictures provided by the original websites if you're curious.
Make this! You won't regret it!
Garlic-Lemon
Double Stuffed Chicken
4 boneless, skinless chicken breasts
4 oz. cream cheese, cut into 4 slices
About 8 oz Cheddar Cheese cut into 4 slices or grated
1 C. milk
1 C. Italian seasoned bread crumbs
½ C. Panko bread crumbs
½ C. grated Parmesano Romano cheese (or regular parmesan
cheese)
1 Tbsp. minced garlic
¾ C. butter, melted
4 Tbsp. lemon juice
½ tsp. garlic salt, or to taste
½ tsp. paprika (optional)
Preheat oven to 350 degrees F. Coat a large casserole dish or 9x13 pan with
cooking spray.
Butterfly each breast by slicing in half horizontally
through the center, cutting almost but not completely through (or pound really
thin so you can stuff the chicken breast and roll up). Place one slice of cheddar cheese and cream
cheese inside each chicken breast. Close
each chicken breast and set aside (or if pounded thin, then roll up and secure
with toothpicks).
Pour milk in a shallow bowl. In a separate bowl, combine both breadcrumbs
and Parmesano Romano cheese. Dip each
chicken breast in the milk, then the breadcrumbs (pat lightly to coat them
better if needed). Place breasts side by side in a single layer in casserole
dish, tucking edges under to seal.
Melt butter. Stir
in lemon juice and minced garlic.
Drizzle evenly over chicken. Season breasts with garlic salt and paprika
(if using).
Bake in preheated oven for 30 minutes or until no longer pink in the center and juices run clear
Tortellini Sausage Soup--picky husband style
Hello Cousins!
I've decided to try to post recipes I've tried/created on here more often. I usually attempt to try at least 1 new recipe every 2 weeks so that I can bulk up my recipe list. Wouldn't it be nice to get to the point where you wouldn't have to think very hard at all when preparing your weekly menu -AND- you also mixed things up enough that it didn't get boring?!?!? I'm trying to get to that point. I think I'm almost there because I asked Jereld if he had any menu requests for the next couple weeks and he couldn't come up with anything. I told him I was trying to not repeat stuff very often. He said, "I can't remember the last time we ate some of our usual dinners." (or something close to that!) WOO HOO! Anyways...without further delay, I tried an Our Best Bites recipe...with my special twist (since my husband doesn't like a few things) and it was GREAT! Definitely a keeper!
Tortellini Sausage Soup
adapted from Our Best Bites
1 lb sausage
2 tsp. minced garlic
1 onion, diced (or cut into HUGE chunks like I did so that the picky eater can remove)
½ c. water
4 C. chicken broth (I used 4 C. water and 4 tsp. chicken bouillon granules)
½ c. apple cider (the original recipe says not to leave this out!! I realized that I was fresh out of apple juice...and had to get out my juicer to make some...can't get better juice than that!)
3 8oz. cans tomato sauce
1 c. sliced carrots
1 tsp. dried basil
1 tsp. dried oregano
2 medium zucchini, grated
2 tablespoons dried parsley
8-10 oz. package cheese
tortellini
2 Tbsp. dried parsley
Crumble sausage into a large soup pot
and brown.
Chop onion and add to pot with garlic
and a drizzle of olive oil.
Continue cooking until onions are
translucent and your sausage is cooked. Add tomato sauce, cider, water, chicken
broth, carrots, oregano, and basil. Cover and simmer for 1/2 hour. Add parsley
and zucchini and simmer for another 15 minutes or so. Add the tortellini and
cook until tender, and then serve with bread and freshly-grated Parmesan.
Tuesday, April 16, 2013
Sweet & Sour Chicken Brewer Style
I have been seeing a lot of recipes for Sweet & Sour Chicken floating around on Pinterest. While alot of them are good, they just aren't what I was looking for. I was looking for something that reminded me of chinese takeout. I like chinese, but I don't like to pay for it for my whole family.
So, I took a recipe that I sort of liked and made it my own! Thus, this recipe was born, and is now a staple around our house!
Hope you enjoy it as much as we do!

To begin: Preheat your oven to 350 degrees F. Line a cookie sheet with tinfoil.


So, I took a recipe that I sort of liked and made it my own! Thus, this recipe was born, and is now a staple around our house!
Hope you enjoy it as much as we do!

To begin: Preheat your oven to 350 degrees F. Line a cookie sheet with tinfoil.
Put your cornstarch in a Ziploc bag.
Chop your chicken into bite size pieces and toss it into the bag as well.

Shake the chicken around in the bag until it is all coated!

Heat oil over medium heat in a large skillet.
Meanwhile...
Whisk the eggs together in a shallow dish and coat your chicken pieces with egg.

When oil is hot, place chicken pieces in a single layer in frying pan.

Cook chicken until outside is brown, turning once. The inside of the chicken does not have to be cooked through at this point, because you're going to bake it...and therefore it WILL be cooked through--just not yet!
Put your chicken on the cookie sheet.
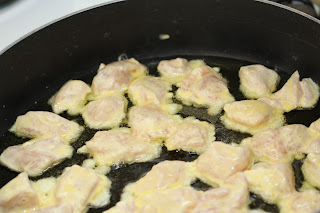
Here's what your chicken should look like this far!

Put chicken in the oven for 30 minutes.
While the chicken is baking:
Combine all sauce ingredients in a saucepan.
At this point, you can see I had a little extra help in the kitchen...looks like someone needs to call their insurance :( he he.

Before heating at all, your sauce will look like the picture below.
Cloudy and weird. It will get better! Trust me!

Bring the sauce to a boil.
Turn down the heat and allow the sauce to simmer until it becomes a syrup. This might take a little while, be patient.
Once it has simmered for a while, the sauce will be much much prettier!

When the chicken is done, pull it out of the oven. It should look like this:

Drizzle with 3/4 of the sauce and lightly toss. It will look like this:

Bake for another 20 minutes.
When chicken is done, lightly toss again.
Serve over rice! We enjoy it over Our Best Bites Coconut Rice Yum Yum!
Sweet and Sour Chicken
Chicken:
4-5 Boneless, skinless chicken breasts
Salt and pepper
1 Cup cornstarch
3 Large eggs, beaten
1/4 Cup olive oil
Sauce:
1 ½ Cup sugar
½ C. Plus 2 Tbsp. Ketchup
1 Cup Apple cider vinegar
2 Tbsp. Soy sauce
2 tsp Garlic salt
1/3 C. Honey
½ tsp. Red pepper flakes
2 Tbsp. Corn starch
Preheat the oven to 350 degrees F.
Heat the
oil in a large skillet over medium heat. While the oil is heating, cut the
chicken breasts into 1-inch pieces. Season with salt and pepper. Place the
cornstarch in a gallon-sized ziploc bag. Put the chicken into the bag with the
cornstarch and seal, tossing to coat the chicken. Whisk the eggs together in a
shallow dish. Dip the cornstarch-coated chicken pieces in the egg and place
them carefully in a single layer in the hot skillet. Cook for 1-2 minutes and
then flip each piece over to cook on the other side until nicely golden but not
all the way cooked through. Place in a single layer on a foil covered cookie
sheet and repeat with the remaining chicken pieces. Bake for 30 minutes.
While
chicken is in the oven, mix the sauce ingredients together in saucepan. Bring to a low boil. Reduce heat and simmer until sauce thickens
to a syrup. After chicken has cooked for 30 minutes, remove from the oven and pour
¾ of the sauce over the chicken on the cookie sheet and toss lightly. Return
pan to the oven and bake for 20 minutes or until chicken is cooked through. Serve
over hot, steamed rice (or the coconut rice from Our Best Bites…yum!). Use
extra sauce as needed/wanted on individual servings.
Subscribe to:
Posts (Atom)
